

How to Build a Concrete Block Wall
 Tweet
Tweet Share
Share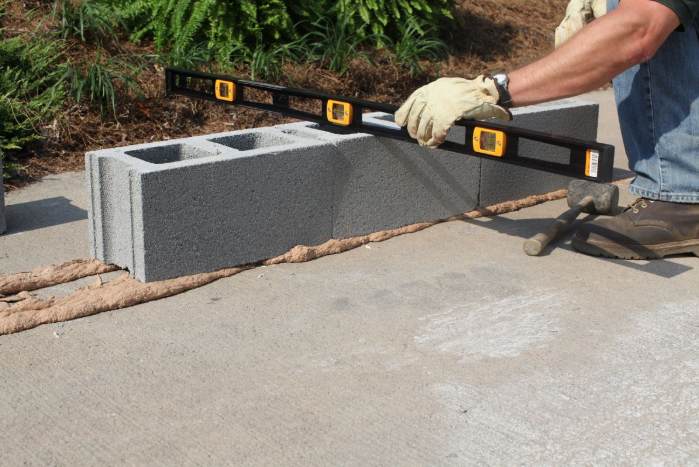
Have you ever encountered a situation when you stared at your yard or your driveway, and you wondered, could I build a good wall there myself? Whether you intend to use a concrete block wall to define a garden boundary, privacy wall, or build a solid retaining structure, it would save your life and money so many times over to know how to build a concrete block wall correctly.
The briefest answer before going into the details is the following: To erect a concrete block wall, you will have to design the layout, excavate and level the ground, pour a concrete foundation, lay blocks using mortar, stabilize with steel bars and clean up the joints to make them durable.
Now, that's the short version. However, when you wish your wall to have a lifespan of several decades, withstanding weather, soil pressure, and time, you will need to know how this is done. We can put it down into manageable bits that even when you have never laid a block before, you can do it.
Step 1: Plan Before You Build
Any good wall has its strong foundation plan. Begin by making decisions as to why you are building it. Is it privacy, structure or appearance? The awareness of this ascertains height, thickness and block type.
The next step is to draw up your wall layout on paper with an indication of corners, turns and details of where a gate or drainage is to be opened. Measure twice, because now it will save your headaches when you are older.
In case you are not sure about the amounts of materials, you can always get a professional who provides construction estimating services to you and can make the right estimates on costs and lists of materials. This keeps your project within the budget and there are no surprises that occur in the middle of the project.
Step 2: Ready the Foundation
However much you have made the wall perfect, it will begin and end with what you put beneath it. Then, start by marking the limits of your wall with lines of string and posts. The next thing is to excavate a trench that is usually 8-12 inches in depth and 2 times the width of your block.
Ensure that the trench is even or straight. Then pour a concrete footing, adding a few inches of compressed gravel at the base as drainage. Allow the concrete at least 24 -48 hours to cure before commencing to place blocks.
This is the thing here: at this stage, the life of your wall is defined. Even the prettiest wall may crack or slant with time due to a sloppy footing.
Step 3: The First Course (It Sets the Tone)
When your footing is in progress, it is now time to lay the first course of blocks. Blend the mortar till it forms a peanut-butter consistency and place a layer of 1 inch over the footing.
Place the first block in one corner, knock it lightly with a rubber mallet, and check it in each direction to determine that it is straight. Lay blocks on the footing, leaving a joint of 3/8-in, between them.
The initial step is the most important. When it is straight and even, then all other things are easier. When it is out, it will go round the wall. So take your time here.
Step 4: Stack, Stagger and Strengthen
On top of each block and at the ends before placing the next block on it, use mortar. It is always a good idea to stagger your vertical joints; this will give them more strength and stability.
To reinforce the wall, the holes in the blocks should be filled vertically when the block is being inserted with steel rebar (particularly when the wall is more than 3 feet high). Then pour concrete or mortar into those cores.
This is what it actually translates to: You are not merely piling blocks; it is a structural building with the reinforcement to sustain the stress that real-world conditions will subject it to, such as shifting soil or strong winds.
Earthwork takeoffs are commonly used by professionals who are undertaking landscape or retaining projects and need to calculate the depth of excavations and the amount of backfill that will be needed to ensure that the wall fits perfectly on the contours of the surrounding land.
Step 5: Keep It Level and Clean
Stop after every two or three rows and see how you are going. Fix it right away when something is not right, and it is better to make corrections at the beginning than make the wall again.
Remove with a trowel and clean your joints up. Mortar that does not dry even might cause the wall to appear sloppy and weak in the long run.
And do not leave out weep holes where you are constructing a retaining wall; they allow water to pass away and they hold up pressure behind the wall.
Step 6: Last Minute Finishing Touches
When the wall has got the height you want, cover it with solid cap blocks or ornamental stones. These not only provide a complete look but also prevent seepage of rain into the mortar joints of the wall.
Ensure that the wall dries for a few days before the paint, stucco or sealant is applied. This is to avoid cracking or peeling in future.
If you live in an area where temperatures change throughout the year, it's important to ensure your walls are properly protected. Adding a moisture barrier or insulation behind them can significantly improve comfort and energy efficiency. Insulation estimating helps you determine the right type and quantity of materials to maintain ideal indoor temperatures while keeping your project cost-effective and environmentally friendly.
Common Mistakes to Avoid
These are even counterintuitive to those with experience in DIY:
Omitting of the footing: The wall will be subsiding or shaking.
Application of insufficient mortar: Weak joints may be used, resulting in cracks.
Not reinforced: Walls that are not reinforced collapse.
Drainage: Water is the mute murderer of thy wall.
All this entails is that there is a payoff on patience. Saving money today may cost twice as much to repair in the future.
The Secret Life Pro Tips of a Perfect Concrete Block Wall
Practical Tips
Block masonry: Use a straight line between blocks.
Blend in small batches of mortar- it is a fast-drying material.
Apply a little dampness, then apply mortar in order to stick better.
Wash the tools frequently; mortar is difficult to loosen when it is dry.
Allow mortar to dry gradually on a tarp when it is hot or windy.
And bear it in mind, everything is consistent. Every layer that you apply gets you a step nearer to looking professional.
Conclusion
A concrete block wall is not simply a question of stacking the bricks but rather a question of time, precision, and familiarity with the minor details that can result in major make-or-buy decisions. Starting from the base to laying the final block, every process determines the quality and appearance of your wall in terms of its longevity.
Next time you are going to hire someone, stop and think about this: with the proper plan of action and a bit of perseverance, you can create a wall that is solid, flat and one that is built to last.
FAQs
Q1: How long does it take to build a concrete block wall?
For a small wall around 3-4 feet high and 20 feet long, expect about 2-3 days of work including footing, curing, and finishing. Larger walls may take a week or more depending on size and complexity.
Q2: Can I build a concrete block wall without mortar?
You can use interlocking dry-stack blocks for small landscaping walls, but for structural or retaining walls, mortar is essential for stability and strength.
Q3: Do I need rebar for every wall?
Not for decorative garden walls under 3 feet, but for anything taller or load-bearing, steel reinforcement bars are a must.
COMTEX_484177467/2891/2026-06-19T08:54:05
Serious News for Serious Traders! Try StreetInsider.com Premium Free!
You May Also Be Interested In
- Ruins highlight efforts to trace, preserve roots
- Navélia Indonesia Strengthens Luxury Yacht Charter Platform for Komodo and Raja Ampat
- N.T. McQueen Releases Armenian Genocide Novel
Create E-mail Alert Related Categories
Globe PR Wire, Press ReleasesSign up for StreetInsider Free!
Receive full access to all new and archived articles, unlimited portfolio tracking, e-mail alerts, custom newswires and RSS feeds - and more!